It’s been really hard to keep updating this blog. But I was motivated to write a little bit about how I retouch my images by Midgiee. I can’t talk to Midgiee for more than five minutes on MSN without us thinking up of of new ideas for photos. She kindly volunteered to let me use an unprocessed image of her for this tutorial
These are the steps I take for doing frequency separation editing. I adapted this technique for Photoshop Elements, because I am cheap and I didn’t have CS5 when I started using it. This should also work using that other editor. There’s many ways to do this technique and there’s plenty of tutorials to be found on google that do this in different, possibly better ways. This is works for me though.
Here is the original image, because I overexposed, I had to set the exposure to -1. Otherwise, settings are default.

Make 4 copies of the background layer.
At the layer at the top of the stack, gaussian blur. Usually do between 4 and 6 for closeup portraits. In this case, I used 4.
Invert the image, then set the opacity to 50% by now, your layers dialog should look like this:
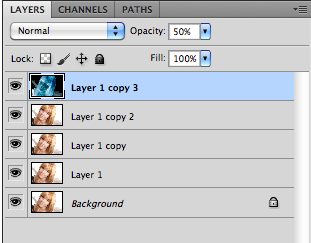
Select the top two layers, right click and select merge.
You should see an image that is just gray with little bits of detail. Rename this top layer to “High Pass” or something meaningful.
Change the top layer blend mode to Linear Light. At this point it should look like this.

The main image now looks very sharp (too sharp) so we need to add the blurred colour layer. Select the layer underneath the high pass layer and use a gaussian blur with the same value we used in the second step (4)
Take the third layer, and gaussian blur it to 20. This is going to be a super smoothing layer that we’ll use later.
Add layer masks to the both the colour and the smoothing layer
Fill the smoothing layer’s mask with black, then move it in between the high pass and the colour. Your layers dialog should look like this.

Now comes the fun part. What we’ve done is separate the texture and colour into different layers. I think the best way to show how this works is by using the clone stamp tool and copying a bit of hair onto the skin, only on the high pass layer.

So still on the high pass layer, you clone the “good” textured skin over the blemishes and bumpy bits. Try and clone from regions that are close by. Because we’ve separated the colour from the texture, it doesn’t matter if the part you’re cloning from or to is a different shade.

You sometimes need to alternate between the colour and the high pass layers. Basically, the high pass is to clone out rough spots, and the colour is for cloning out blemishes and spots, sometimes you need to clone on both layers. I constantly adjust the opacity and flow of the brushes to make this easier.
To reduce the shadows under the eye, we can clone bits of colour select the colour layer, then click New Layer.
Use the clone stamp tool but set the sample to current layer and below

Copy from nearby sources for the right tone. You can then control how much this shows by changing the opacity of the colour clone layer.
Next, we can use the brush tool to paint “white” onto the smooth layers mask. The whiter the mask is, the more opaque it becomes and the more blur shows through. I usually do this on the arms/neck area that don’t usually get makeup. You can also use it to reduce the contrast of shadows.

The last step is to sharpen. This can be done by painting black onto the colour layers mask to let the high pass layer filter the unedited background. I made the eyelashes sharper (actually, I probably over did it in this case) , and also the white catchlight. Because Midgiee’s wearing blue contacts, I would also hue shift or just paint black the brown iris that shows through the blue, but I was lazy and didn’t for this tutorial.

You can hopefully see why this technique is so great, particularly in the area under the eyes. The skin texture is still there, while the shadow has been softened. However It’s very easy go overboard and turn the skin to very smooth plastic, so I’m constantly referring back to the original image. It also helps to do things on different layers with masks to use brushes and opacity to fine tune the amount of softening.
I then added a curves adjustment layer to the top of the layer stack to increase the contrast a little bit.
Here’s is a before and after comparison.

For fun, I tried the same thing with Lightroom’s “Soften Skin” brush, which I dislike more and more each day. I notice the weird things that it does to the colour tones in the shadows (under the eyes, they look a reddy orange). The photoshop version is on the left.

Wow, so much work! Very interesting. I wonder how the results compare with Portrait Professional, the preferred solution for people with “other things to do”.
I did download the trial, but never got around to trying it 🙁
Thank you! I was so mad I couldn’t do frequency separation in Elements because there is no apply image feature. This is great.
Thanks!
That hair colour is not right for her – tell her she may have cool colouring (skin eyes etc) therefore the yellow tone in the hair clashes with pink undertones in the skin. If she was analysed under the seasonal colour analysis system, (or SCI/art) she would probably find she is a ‘winter’ or ‘summer’. I know this is completely off topic, but I also know that I wish someone had told me this when I had my hair the wrong shade of red for several years without realising how wrong it was for me. 🙂 I’m not trying to be mean by the way, just helpful (a bit like if someone tells you you have a label sticking out etc)
Actually having looked again I see she is wearing contacts – it may be this throwing things off, whatever it is – there is something discordant going on colour-wise, a bit like when you have mismatched colour temperature lighting in your photos. Very pretty girl though – I hope what I’ve said doesn’t upset her!
This was a great step-by-step tutorial – Thanks so much!
Thankyou!
Hi, I started with your info but when I inverted my image it didn’t look the same as yours. I am using PSE 9. I chose layers – adjustment layers – invert. My pictures looks like a negative but the actual layers on the right side do not look the same. It creates a new layer with two boxes with (one white box) Is there another step that should have been written down.
Thank you,
Susan
Hi!
It doesn’t work with adjustment layers. You have to make duplicates and actually invert the layer. I haven’t used PSE for a long time, but in Photoshop CC its the menu item Image->Adjustments->Invert.
Photoshop Premium Tutorials: Subscribe for Free Copy: http://www.ebookspro.info
I see a lot of interesting articles on your page. You have
to spend a lot of time writing, i know how to save you a lot of work, there is a tool that creates high quality, google friendly articles in couple of seconds, just type in google – k2 unlimited content
Has anyone created an Action which can automate this technique?
Hi, you post interesting articles on your site, you can get much more
visits, just type in google for – augo’s tube traffic
I am new at using my Elements 12, and I would like to learn how to do Frequency Separation with it. I am stuck on your 3rd step: “Invert the image, then set the opacity to 50% by now, your layers dialog should look like this.” How do I invert the image? After doing the first 2 steps (make 4 copies and gaussian blur on the top copy), my Inverse under Select is not light up. What do I need to do?
Thank you,
Jennifer
Invert is a command in the filters menu, just like Gaussian Blur. Go to Filter > Adjustment and then just click Invert, Elements will do the rest for you. Then all you have to do is make that layer 50% opacity and combine it with the layer below which bring the opacity back to 100% for the merged layers.
Stick with it, and don’t be afraid to have to start over. I’m not that good with this type of thing and it took me a few tries, but its worth it.
Be sure that once you have the setup done properly that you follow the rest of his instructions for doing the actual toning, that is very important or you wont get the desired results..
Good luck~
Thank you for your help, Paul!
I’m a bit confused with the new names of the layers. I changed the top layer to ‘High Pass’ – no problem there, but I’m not sure of Layer 1 copy and Layer 1’s new names…
Select the layer underneath the high pass layer and use a gaussian blur with the same value we used in the second step (4)
Is this the ‘Layer 1 copy’? And it becomes ‘Smoothing’?
Take the third layer, and gaussian blur it to 20. This is going to be a super smoothing layer that we’ll use later.
Is this ‘Layer 1’ and it becomes ‘Colour’?
Add layer masks to the both the colour and the smoothing layer
I did this with no problems, but…
Fill the smoothing layer’s mask with black,
I don’t know how to do this. I tried right clicking on the Mask, and I chose ‘Mask Options’ and changed the color to black – or I though I did, but when I clicked ‘ok,’ the mask remained white.
…then move it in between the high pass and the colour.
This is why I am unsure of which layer is which. If ‘Layer 1 copy’ (“the layer underneath the high pass layer”) is the Smoothing layer, then there is no need to move it…so Layer 1 copy must not be Smoothing…am I making sense? I don’t see where and when we were instructed to rename the Layer 1 copy and Layer 1.
Thank you for your patience and help!!!
Blessings,
Jennifer
Hi Jennifer, sounds like you’re making progress, that’s great. I have no doubt that as you stick with this tricky little problem, you’re confidence will grow leaps and bounds, because its’ really neat what Mr. Lopez has done with making this tool.
So it sounds like you are on the right track. To turn a layer the opposite color, in this case from white to black, there is a short-cut key. Select the layer thumbnail from within the layers window by clicking on it. Then simply hit the following keys:
CTRL + i (for Windows)
Command + i (for Mac)
The ordering of the color layer and the smoothing layer is a bit confusing in the directions. Basically you want to end up with the smoothing layer above the color layer. It doesnt matter what order you do it in, as long as the smoothing layer is just above the color layer, it has a Gaussian blur of 20, and the mask is filled i with black,,
Good luck!! paul
Hi Paul,
I can’t thank you enough for taking your time and helping me through this process. I greatly appreciate it!!!
As I mentioned before, I am new to my PSE12. I am also NOT at all computer savvy; thus, I need lots of help with step-by-step instructions.
I have now gotten through what you explained in your previous email. (Again, thank you so much!) And, alas, I am stuck on the very next step. = P
I do not understand what is meant by…
“the best way to show how this works is by using the clone stamp tool and copying a bit of hair ONTO the skin, only on the high pass layer.”
Copy a bit of hair from where? and put it onto the skin where? and, why would I do this?
It also says: “Copying only the Texture.” Does this mean I need to turn off “Sample all layers”?
I am suppose to be on the High Pass layer, correct? And the other three layers: Smoothing, Colour, and Background, are still in view under the High Pass layer, correct? I was not suppose to do anything with these layers after renaming them, correct? If so, I missed that and am not sure what to do.
Thank you so much for your time and help!!! I am determined to get this…but I am not able to on my own. = (
Blessings,
Jennifer
Where’s the answer for this one??because i happen to be stuck on this step also,in fact the clone stamp tool doesn’t copy anything at all on the high pass layer
nevermind that i’ve got it now*feeling slightly foolish*
Well, I guess I’m still a fool…what am I missing???
Thanks,
Jennifer
Wow! lots of activity on a very old post! I’ve actually moved on to full photoshop quite some time ago, but I’ll try and help. Whats the bit thats giving you the most problems?
Well, probably my biggest problem is I am very much a visual learning, and step-by-step tutorials are most helpful for me, but I cannot find a tutorial on how to do this, but I did find your post, so I am doing my best to get it…but I am not doing very well.
Anyway, with a lot of help from Paul, I made it to where you say, “Now comes the fun part. What we’ve done is separate the texture and colour into different layers…”
But I am stuck again.
You say, “using the clone stamp tool and copying a bit of hair onto the skin, only on the high pass layer.”
Okaaay…I guess…
You say, “Copying only the Texture”
What do you mean by this? How to I copy only the Texture? I’m suppose to be on the High Pass layer, correct? Should I have the ‘Sample all layer’s’ unchecked? When I try and clone on this High Pass Layer, something weird happens: I’m not sure how to explain it. The place that I tried to clone turns out a weird color – kind of florescent.
Sorry to be so ignorant about all this.
Thank you for your help and time.
Jennifer
No problem.
I was only using the hair as an example. Doing the separation means you can clone the texture without affecting the other parts.
For skin you would normally copy the texture of the good smooth pores over the rough big pores.
And yes, you just need to switch off the sample all layers and only clone on the high pass one 🙂
There’s a good video that explains the technique here http://fx-ray.com/tutorials/skinretouching/
My post is just how to do the “separation” bit when you don’t have access to photoshop’s “apply image” or the various actions you can download to do it for you.
From then on the cloning and blurring is pretty much the same principles
Good luck! Let me know if you need anything else.
This is precisely the kind of tedious work flow that I don’t have any time for and why I finally took the plunge and purchased PortraitPro. I’m not a pitchman for the company and I have no vested interest other than the $50 or so that I dropped on their product.
The time that it’s saved me more than makes up for the small cost. What used to take me an hour or two only takes 5-10 minutes. I suppose if you’re making huge prints, several feet wide in my case from a Nikon D800, PortraitPro may show some unwanted artifacts that wouldn’t appear had I meticuously worked at the pixel level. In my case, if I ever get an assignment where the end result is a wall sized ad, I will fork the money over to a retouching professional. But for 99% of my portrait work, PortraitPro gets the job done.
Thanks for your comment. In this example, its pretty tedious because of all the manual layer work that needs to be done for Photoshop Elements. In Photoshop there’s many free downloadable actions that automate the process. FX-Ray (http://fx-ray.com/tutorials/fs/) is my favourite one.
I’ve found the process can be quite quick with practice: https://www.youtube.com/watch?v=G_Jy9BML9Tw Now that I use a wacom tablet and the action its much quicker.
I’ve tried Portrait Professional, Face Filter and Perfect Portrait and the results felt a bit fake for my liking so I prefer doing it manually. Then again, as I am not a pro. I don’t have impatient clients or deadlines to deal with so I can take my time to get the best results 🙂
BTW, I know this is a very old topic but current in many ways.
You are so awesome! I don’t suppose I have read something like this before. So good to discover another person with genuine thoughts on this issue. Seriously.. thanks for starting this up. This web site is something that’s needed on the web, someone with a little originality!
Great information. Lucky me I recently found your website by accident (stumbleupon).
I’ve saved as a favorite for later!
What happened to the post? 🙂 Very interested in how this is done in elements.
Thanks for the comment, looks like my site got broken into… I’ve managed to restore this post.